Enamel dial making
A lecture on enamel dial making, being the second of a series on the various branches of the trade, was given by Mt. T. J. Willis, on Tuesday, December 12th 1876 – Mr. Jackson, V.P., in the Chair.
Mr. WILLIS, after a few introductory remarks from the Chairman, said: I feel great diffidence in coming before you this evening, because, to make myself understood by the younger members present, I must state little details which must appear ridiculous to the elder ones and those in the trade; but I will at once explain to the best of my ability the process of enamel dial making. The coppers or blanks may be either made by hand or stamped out, but the more usual way is to make them by hand, therefore I will describe that process.
You will commence by taking a die of the size required; then take a piece of copper, and placing it on the die, punch the center hole with a conical punch. Then file off the top of the cone thus formed, and open the hole with a round broach to the die, leaving sufficient for the burr to hold the enamel. This burr must be filed off even all round to the thickness you require the dial. You then lay the copper on the frame and mark the feet. Having soldered on the feet, which may be done either with silver-plated wire or spelter, it is then pickled or cleaned in oil of vitriol and water, and carefully brushed out and dried. You will now set it in shape, which is done by first flattening with a spatule on a die a little smaller than the copper, and setting it up slightly lunette shape. The height there is no rule for, as some samples of enamel require to be much higher than others, but a little practice will soon give you that. We have now the copper ready for enamelling.
Before we proceed further I had better tell you what enamel is. It has flint for its basis, combined with fluxes to make it fusible. A good white enamel may be made of the following: silver sand 14 parts, borax 10, red lead 18, nitrate 2, oxide of tin 12, flint glass 4, and peroxide manganese one-fiftieth of a part. These are melted together and poured out in cakes, and when cold are ready for use. I hardly think I need describe our furnaces, as the muffle furnace is now so well known. Placing a portion of the enamel in the furnace, you warm it to near red heat, and plunge it in cold water. It is then easily broken and pulverised in a mortar to nearly the coarseness of sand. This must be varied as the enamel requires.
Be very careful to grind your enamel as even as you can, that is, the atoms as near of a size as possible. Much care is required in this, as if some are larger than others you will have a bad surface, for the large ones do not fuse as quickly as the small ones. Having washed out the fine portion of enamel, you will now lay on the bottom by spreading it on with a spatule, and tapping it lightly with the spatule it soon flows even; you then lay them on a cloth to dry. They are afterwards laid on a block, covered with soft wax, and the top laid on, which is a delicate operation, as if too much enamel is laid on it will be rounding, and if too little, hollow on the edge. The dials are then dried and fired, but not run to a level surface, as they would not in that case stand the second fire. When cold, examine them with care, and if there are any defects they must be picked out with a sharp graver. They are then to be ground off with sandstone till level. After being washed clean and dried, they are again fired to surface them.
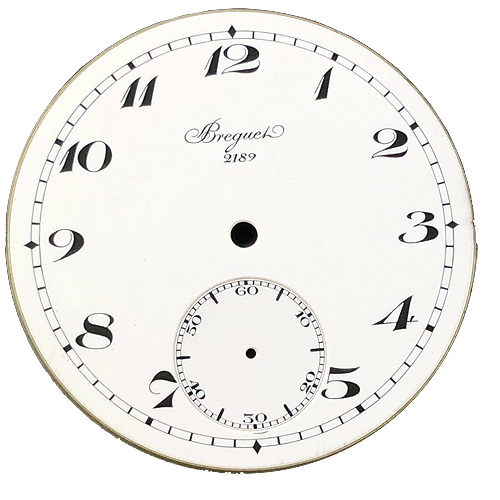
We have now the “whites” (as they are called in the trade) made. You will begin the painting by grinding the paint. It is composed of a black enamel, which melts at a lower temperature than the dial, mixed with oil of spike lavender. You cannot well grind it too fine, divide the dial, with a dividing plate, similar to a wheel cutting plate, but, with an index or ruler mark the divisions with a black lead pencil. Then draw in the hours roughly and dry off by slight heat, not too great, or they will brush off in dusting; then cut off the ends with an ivory point in a pair of compasses, and rule them in shape with an ivory point. The remainder is then done with a pencil, similar, of course, to ordinary sign writing. Having fired the dial again, this time on a ring made of fireclay rubbed perfectly flat, you set it in shape with a pair of spatules, one in each hand, pressing lightly and evenly all round.
You will now file off the superfluous copper on the edge and stone with a Water-of-Air stone, and gild either by battery or mercurial gilding. I prefer the latter, as it stands so much better. You will now cut out the seconds. In this I rather differ from the usual way, which is to cut from the face or top side of the dial, and then, as you cannot cut through square, to file out the hole to remove the copper and allow the piece to go down. In my own practice, I cut from the back in a small vertical lathe, and the taper is then on the top side, and no filing is required. The reason I do this is to obtain greater truth. The hole is a more perfect round and sounder. I cut the holes with a copper cutter and oil and emery of suitable coarseness. The cutters have a sliding center, similar to a watchmaker’s mandrill, and besides lasting a long time, are very true, and the hole for the seconds hand is drilled last, so you have no pin working in the hole to make it unsound. Having cut out the dial, you chamfer it with a brass chamfer tool and emery. This requires a great nicety, as the chamfer should be the exact depth you require the sink to be. If it is not so, you will always have a dirty-looking line round the rim.
The seconds pieces are polished with a wooden polisher and stone-dust. Do not put a greater polish on the seconds pieces than on the surface of the dial. Fit in the piece which is always cut out a little larger than is require, and ground on a Water-of-Air stone, to fit and remove the roughness off the edge. Then fasten in the piece with cement, composed of bleached shellac and flake white. This is done by laying the piece in its place and holding the dial over the gas. When it is cold, clean off the superfluous cement with a penknife, polish the edge of the dial, wipe it clean, and it is finished.
Taken from The Horological Journal, January 1877
| « Collecting of balance-cocks and watch keys | Pocket watches crystal glass scratches removing » |